The Specialists
The Specialists (short: “TS”) is a style where each hedgehog has its own ammo and specialty. It starts out by having the players place their hogs on the map, then the game begins. At the beginning of a turn, the choice is given to either switch to any hog, or use the one selected. Each hog has its own set of weapons, which are reset after each turn. They also have their own specialty, which is in the hog guide.
Each of the hogs has its own usage, and it varies somewhat in its usage depending on if the game is with 3 or 8 hogs. (Different amounts can be used, but 3 and 8 are the most common.) The number of hogs used effects which ones are used. The hogs are used in the order that they are listed in the reference. So a Loon is never without a Demo, and a Pyro never appears in a 3 hog game. Overall, their roles are the same.
Game settings
- Each hedgehog has its own weapons (see below)
- Weapons reset after each turn
- Infinite attacks
- Players place hedgehogs at start of game
- Free hog selection at turn start
- Turn time: 45s
- 100% health crates
- Sudden Death after 16 rounds
- Sudden Death damage: 5
- Mine timer: Mines that appeared at the start of game explode after 3 seconds, mines that were placed by hedgehogs explode after 5 seconds.
Note: You can change some of these settings by using the game scheme.
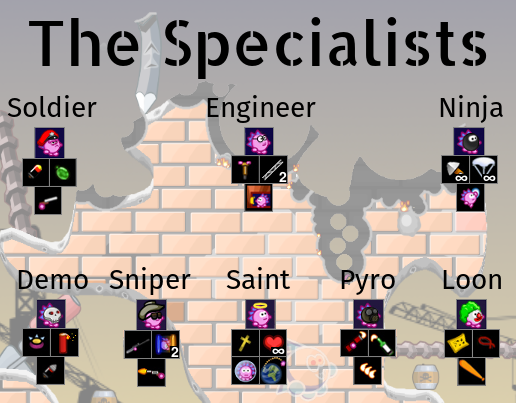
The hedgehogs
Soldier
Soldier uses the staples of any modern hedgehog's army. Use it anytime it is close to a hog under about 100 health, as it can kill it in one turn. Start off with a grenade, to widen the hole in which he can shoot, then do some damage with a bazooka, and finish him off with some shotgun action. If a hog is farther away, use a closer hog to do the dirty work, or go in with an engineer.Placement
Soldier can be placed pretty much anywhere, as long as he is semi-sheltered, and can move around enough to get to other hogs, when they are placed.Engineer

- Hedgehog number: 2
- Health: 100
- Ammo:
- 2×Construction
- 1×Blowtorch
- 1×Pick Hammer
Placement
The engineer should be placed in a place near other hogs, but hard to get at. A great example is the tire in the Highway theme. Putting the engineer in there provides protection until he has an opportunity, and then he can get out with a blowtorch. Look for places that are enclosed, but can be escape from using a blowtorch or a pickhammer.Ninja
 Any shoppa fanatic will be at home with this hog. He can go across the map, punch a hog, and get back in one turn, so the enemy has no chance to react. Be careful to protect this hog, at it has only 80 health.
Placement
Stick Ninja somewhere where it is moderately sheltered, but still has things to rope onto to get out of wherever it is. Since Ninja can get to almost anywhere on the map, and shoryuken a hog, never ever place a hog close enough to the edges to be punched over the edge. Don't do it. You'll lose a hog right off the bat that way.Demo
- Hedgehog number: 4
- Health: 200
- Weapons:
- 1×Dynamite
- 1×Drill Rocket
- 1×Mine
Note: Mines placed by hedgehogs explode after 5 seconds.
Placement
At this point, there are already 3 hogs on the map. Intimidation becomes a useful tactic at this point. Since Demo is a pretty powerful hog, it may be used to intimidate a poorly placed engineer or ninja, forcing the other player to use their first move to save their weaker hog. If there are no ninjas or engineers in reach, or trying to attack them would be fruitless, place Demo like a soldier.Sniper
- Hedgehog number: 5
- Health: 120
- Weapons:
Placement
Put it somewhere high-ish, but not in danger of being killed by a ninja. Make sure he is close enough to hogs to make a portal kill if necessary.Saint
- Hedgehog number: 6
- Health: 300
- Weapons:
- ∞×Seduction
- 1×Resurrector
- 1×Invulnerable
- 1×Low Gravity
Placement
Put Saint near the main group of hogs, though a bit more sheltered, and use her to resurrect dead hogs.Pyro
- Hedgehog number: 7
- Health: 150
- Weapons:
Placement
Since Pyro's main weapon is napalm, it's best to smuggle it away into a totally inaccessible place. This should keep it safe enough to napalm for most of the game.Loon

- Hedgehog number: 8
- Health: 100
- Weapons:
Hint: It's a good idea to poison the saint early on with him.
Placement
Loon is mainly an intimidation hog, like Demo, because it can kill in one turn. Stick it next to a hog low on health, or the Saint. If it is stuck near a low-health hog, the other player will use up his first turn dealing with him. If he is stuck next to the saint, make sure to switch to him near the first turn and poison it.Custom hedgehog order
You can customize the hedgehog order by using the script parameter.To use a custom ordering of hedgehog, write “t=<letters>”, where “<letters>” is a sequence of 8 letters, each letter stands for 1 hedgehog.
| Letter | Specialist |
S |
Soldier |
E |
Engineer |
N |
Ninja |
D |
Demo |
X |
Sniper |
H |
Saint |
P |
Pyro |
L |
Loon |
Example: t=SSSSPPPP: 4 soldiers and 4 pyros.
Team-specific hedgehog orders
You can also specify different hedgehog sets for each team. The syntax for this ist1=<letters>, t2=<letters>, ..., t8=<letters> (and so on), with t1 to t8 standing for the 1st to 8th team. Teams that you didn't specify use the default specialists set.
Example: t1=LPHXDNES,t2=NNNNNNNN: Team 1 has Loon, Pyro, Saint, Sniper, Demo, Ninja, Engineer, Soldier (in this order), Team 2 has only ninjas and all other teams have the default specialists.